
Creating a custom product type in WooCommerce gives every specialized product a clear, reusable structure. Instead of rebuilding the same fields and product-page details for every course, service, book, or appointment, you can create the model once and reuse it across your catalog.
In this guide, you will build an Online Courses product type with a dedicated admin tab, organized course fields, a tailored product layout, and selected information displayed automatically on the product page.
What you will create
By the end of the setup, your WooCommerce store will have:
- An Online Courses option inside the WooCommerce product type selector.
- A Course Details tab that keeps course information in one place.
- Structured fields for the instructor, duration, access period, and included materials.
- Customer-friendly course information displayed in the right position on the product page.
- A reusable setup for every new course added to the store.
This is the key benefit of a custom product type: your team follows one reliable workflow while customers see consistent, useful product information.
Why use a custom product type instead of repeating product content?
Imagine managing twenty online courses. If the instructor, duration, level, access period, and materials are written manually inside every description, each editor may use different labels, formatting, and placement. Updating the catalog becomes slower, and comparing courses becomes harder for customers.
A custom product type turns those repeated details into an organized product model. Editors know where to enter the data, and WooCommerce presents it consistently across products using that type.
| Without a custom product type | With a reusable Online Courses type |
|---|---|
| Course details mixed into descriptions | Course details stored in dedicated fields |
| Different labels from one product to another | Consistent labels across the catalog |
| Editors must remember the required information | The Course Details tab guides the editor |
| Product pages require manual formatting | Selected data appears in a controlled position |
| Every new course starts from scratch | Every course reuses the same product model |
If you are still deciding whether your catalog needs a dedicated model, start with What Is a Custom Product Type in WooCommerce?.
Step 1: Define the product model
Before opening the settings, describe the product type in one sentence:
An Online Course is a virtual WooCommerce product with an instructor, duration, access period, learning level, delivery mode, and included materials.
This sentence keeps the setup focused. It identifies the information shared by every course without mixing the product model with individual course titles or categories.
For this example, we will use:
| Setting | Value |
|---|---|
| Product type | Online Courses |
| Singular label | Course |
| Plural label | Courses |
| Admin tab | Course Details |
| Store-managed data | Instructor, duration, access period, materials |
| Customer-facing information | Level, learning mode, start date |
Step 2: Create the new WooCommerce product type
- Open your WordPress dashboard.
- Go to WooCommerce > Product Types.
- Click Add New.
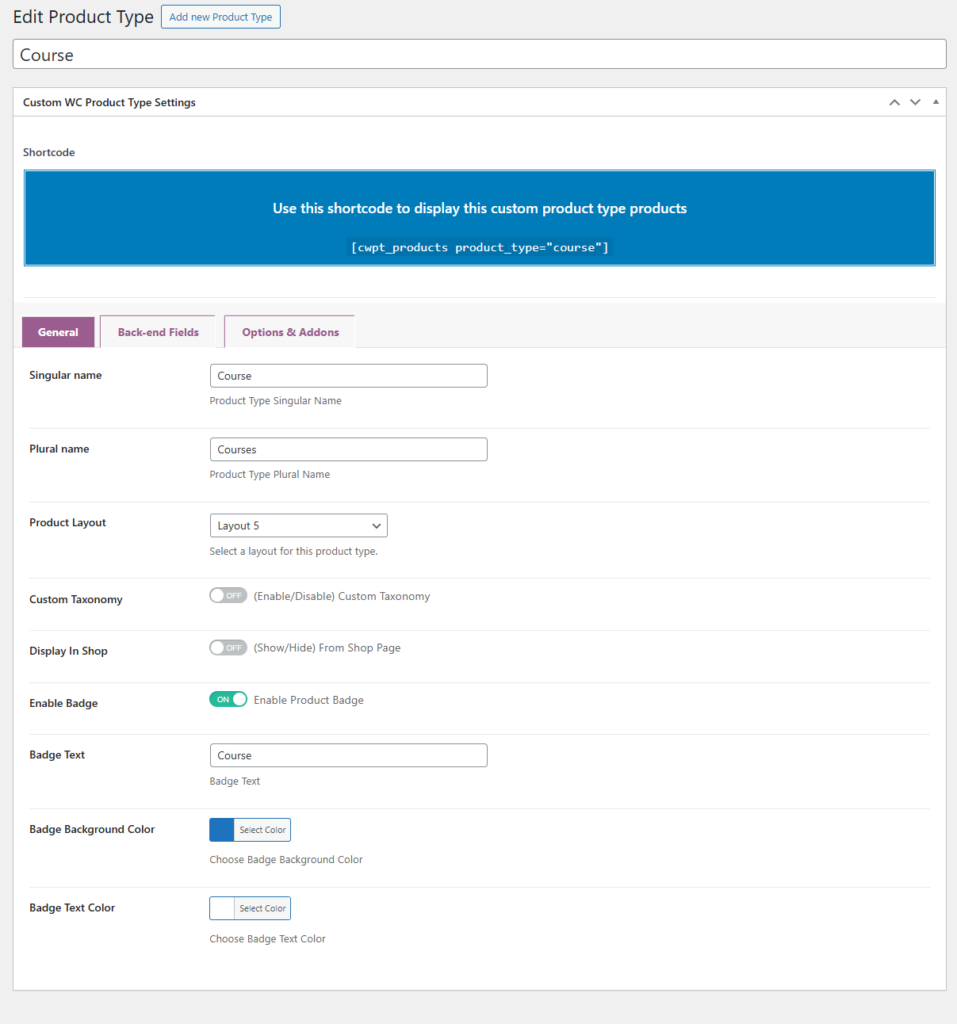
- Enter Course as the singular name.
- Enter Courses as the plural name.
Clear labels make the type easy to recognize when editors create products. They also give the product model a stable identity that can be reused throughout the catalog.
Step 3: Choose the product-page layout
In the General settings, choose how products using this type should be presented. Keep the default WooCommerce layout for theme consistency, or preview the other layouts available in your installed version before choosing one.
Use the default layout when you want the course to follow your current WooCommerce theme. Test the additional layouts when the product needs a more distinctive presentation for course information and customer options.
A useful selection process is simple:
- Use the default layout for the fastest integration with the existing store design.
- Preview the available layouts with realistic course data.
- Choose the layout that keeps the title, price, course details, and purchase action easy to scan.
- Check the final choice on desktop and mobile.
The layout belongs to the product type, so every course can follow the same visual structure without rebuilding the page.
Step 4: Organize course browsing
Enable Custom Taxonomy when the Online Courses model needs its own hierarchical classification. This can help organize courses by subject, program, or another structure that applies specifically to the type.
For example, a course catalog could use terms such as:
- Web Development
- WordPress
- Digital Marketing
- Graphic Design
This gives customers a clearer way to browse related courses while keeping the product type focused on the course data and workflow.
Step 5: Decide whether courses appear in the main shop
Use Display In Shop according to the customer journey you want to create.
- Keep courses visible when they should appear with the rest of the WooCommerce catalog.
- Hide them from the main shop when courses have their own focused landing page or navigation path.
This setting lets you keep the catalog organized without removing the products themselves. A dedicated course page can present the collection with more relevant copy, filters, and internal links.
Step 6: Add a product badge when it improves recognition
Enable the product badge when customers should identify course products quickly in WooCommerce listings. Add concise badge text such as Online Course, then choose background and text colors that match your store design.
The badge is most effective when it communicates a useful distinction. Keep the text short and ensure it remains readable over product images.
Step 7: Create the Course Details admin tab
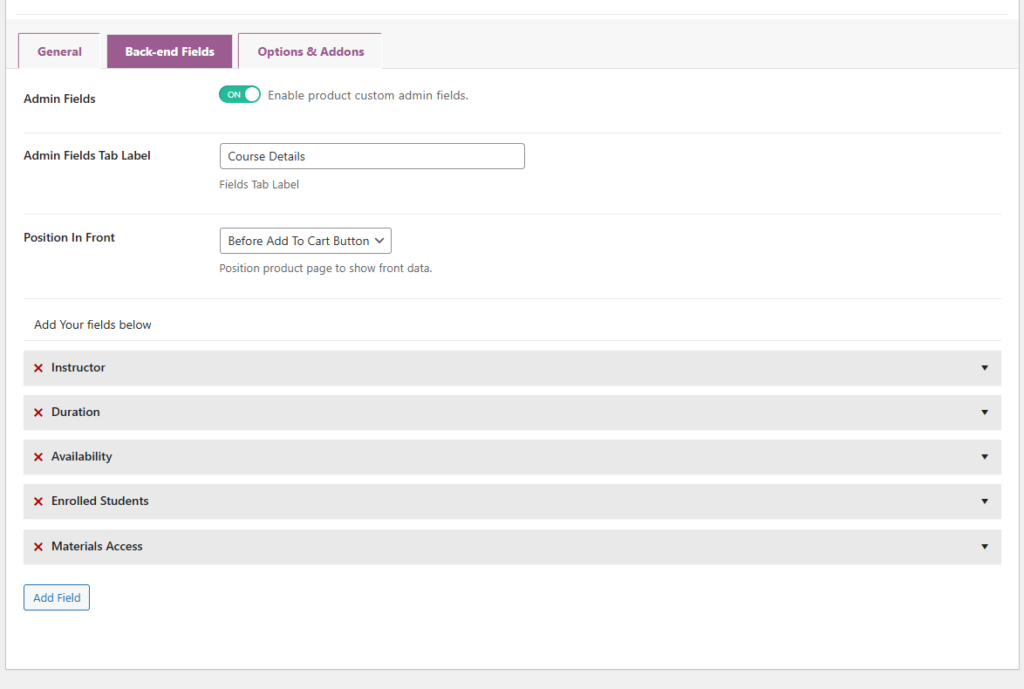
Open the Back-end Fields section and enable Admin Fields. Set the Admin Fields Tab Label to Course Details.
This tab becomes the editing workspace for information shared by every course. Instead of asking editors to remember where each value belongs, the product type presents the required fields together.
A well-designed tab improves:
- Product creation speed.
- Data consistency between courses.
- Training for new store editors.
- Quality control before products are published.
Step 8: Add the course fields
Use the field builder to create the information your store manages. Custom Product Type for WooCommerce supports Text, Textarea, Select, Radio, Checkbox, and Number fields for the admin product model.
Start with a focused Course Details structure:
| Field label | Field type | Example value | Customer benefit |
|---|---|---|---|
| Instructor | Text | Mohamed Saad | Shows who teaches the course |
| Course Duration | Number or Text | 30 hours | Sets the expected time commitment |
| Course Level | Select | Beginner | Helps customers choose the right difficulty |
| Learning Mode | Radio | Self-paced | Clarifies how the course is delivered |
| Materials Included | Checkbox | Yes | Confirms what is included |
| Access Details | Textarea | Access for 90 days | Explains how long access remains available |
Each field can include a clear label and description, making the form easier for editors to complete correctly. Select and Radio fields can use controlled options separated by the format provided in the field settings.
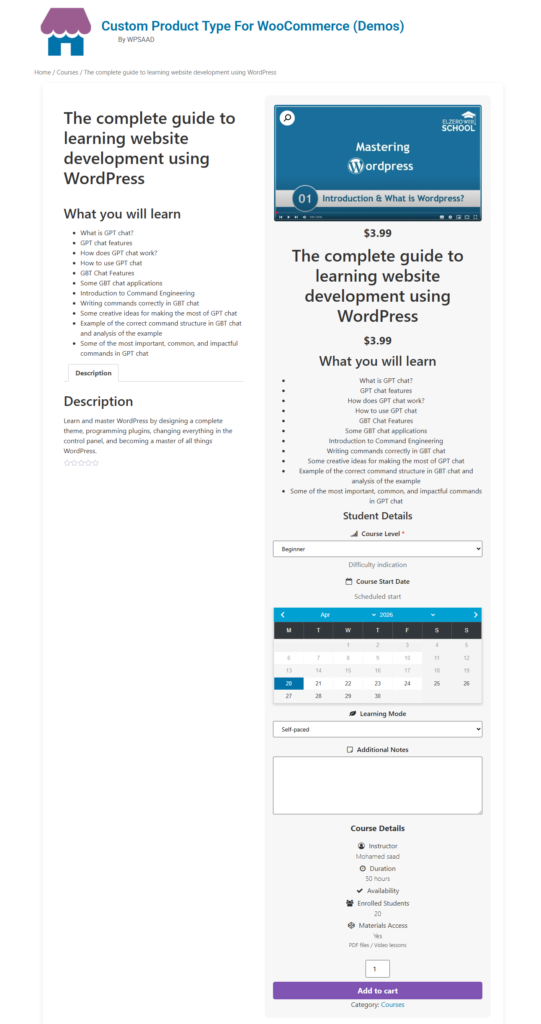
Step 9: Show useful course information on the product page
Enable Show In Front for fields that help customers understand the course. Instructor, duration, level, learning mode, materials, and access details all support the buying decision.
Keep operational notes and internal management information inside the dashboard. This gives editors the data they need without adding clutter to the public product page.
For a deeper field-planning workflow, use How to Add Custom Fields to a WooCommerce Product Type.
Step 10: Choose where the information appears
The Position In Front setting controls where the selected course information appears on the single product page. Available positions include:
- Before the Add to Cart button.
- After the Add to Cart button.
- Before Product Meta.
- After Product Meta.
- Inside the Single Product Summary.
Choose the position according to the value of the information:
| Information | Useful position | Reason |
|---|---|---|
| Level, duration, and learning mode | Before Add to Cart | Supports the purchase decision |
| Additional course specifications | After Add to Cart | Adds detail without delaying the main action |
| Reference information | Before or after Product Meta | Keeps secondary details organized |
| Compact course overview | Single Product Summary | Places core details near the main product content |
Preview the page with real values. The best position is the one that helps customers understand the offer before they need to scroll or search for essential details.
Step 11: Add customer options when the course requires them
Backend fields describe the course. Customer options collect a choice or value from the buyer. Depending on your course offer and plugin version, you can build options for details such as:
- A preferred start date.
- Live or self-paced attendance.
- Additional student notes.
- A document required before enrollment.
Keeping customer input separate from the Course Details tab makes the product model easier to manage. The store defines the course; the buyer completes only the choices required for the purchase.
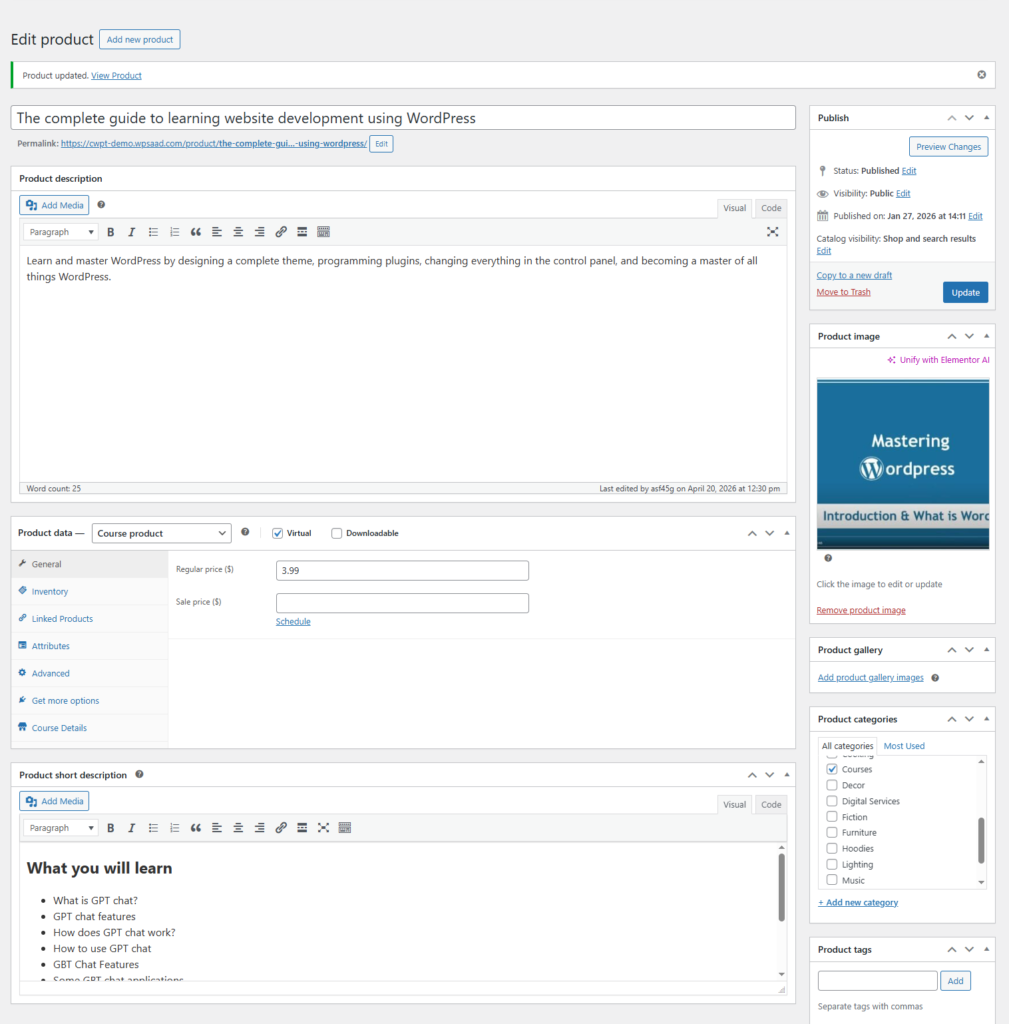
Step 12: Publish the product type and create the first course
- Review the General and Back-end Fields settings.
- Publish the Online Courses product type.
- Go to Products > Add New.
- Enter the course title, description, price, and featured image.
- Mark the product as Virtual when it does not require shipping.
- Select the new Course product type.
- Open the Course Details tab and complete the fields.
- Save the product as a draft and preview the product page.
The first course is your reusable proof of concept. Check the editor experience, field labels, layout, frontend position, and mobile presentation. Once the structure feels clear, every new course can follow the same process.
The result: a faster and more consistent course workflow
Your store now has a dedicated product model instead of a collection of manually formatted course pages. Editors can create courses faster, customers receive consistent information, and the catalog becomes easier to expand.
| Store workflow | Customer experience |
|---|---|
| One Course Details tab | Clear and consistent course specifications |
| Reusable field definitions | Easy comparison between courses |
| Controlled frontend position | Important information appears near the purchase action |
| Shared product layout | A recognizable course-page experience |
| Optional taxonomy and shop visibility | Focused course discovery |
The same method can create product types for books, services, events, appointments, furniture, food ordering, and other specialized WooCommerce catalogs. The fields change, but the workflow remains reusable.
Create your first custom product type
Custom Product Type for WooCommerce gives you a visual workflow for building product types, admin tabs, structured fields, layouts, frontend data, taxonomies, badges, and customer options inside WooCommerce.
Start with the product family that takes the most time to create manually. Build one focused type, complete one real product, and turn that working model into the standard for the rest of your catalog.
For a complete course example with screenshots, continue with How to Build an Online Courses Website in Minutes.
Frequently asked questions
Can I create a custom WooCommerce product type without coding?
Yes. Custom Product Type for WooCommerce provides visual settings for creating the type, labels, layout, admin tab, fields, display position, taxonomy, badge, and shop visibility.
Which fields can I add to the admin tab?
You can build the product model with Text, Textarea, Select, Radio, Checkbox, and Number fields.
Can product data appear on the product page?
Yes. Enable Show In Front for the relevant fields and choose their position around Add to Cart, Product Meta, or the Single Product Summary.
Can I hide a custom product type from the main shop?
Yes. Use Display In Shop to decide whether products using the type appear in the main shop catalog.
Can each product type have its own categories?
Enable Custom Taxonomy when the product type needs a dedicated hierarchical classification for its products.

![Best WooCommerce Product Feed Plugins to Sell on Multiple Marketplaces [2026] | WPSAAD](https://wpsaad.com/wp-content/uploads/2026/08/Product-feed-plugin-guest-post-300x300.webp "Best WooCommerce Product Feed Plugins to Sell on Multiple Marketplaces [2026] | WPSAAD")