
Adding custom fields to a WooCommerce product type gives editors a reliable way to enter specialized product data and gives customers a clearer way to evaluate the offer. The goal is not to add as many fields as possible. It is to build a reusable data structure that makes every product easier to create, review, and buy.
Custom Product Type for WooCommerce lets you organize fields inside a dedicated admin tab, choose suitable field controls, decide which values appear publicly, and place those values around key areas of the WooCommerce product page.
What you will build
This guide uses a Service Package product type. The finished model will include:
- A Service Details tab for store-managed information.
- Structured fields for duration, delivery method, response time, revisions, and preparation notes.
- Controlled values that keep service listings consistent.
- Selected details displayed near the WooCommerce purchase area.
- A clear separation between product facts and information supplied by the customer.
The same method works for books, properties, courses, events, furniture, food products, and other specialized product families.
Start by assigning ownership to every value
Before creating a field, decide who controls its value and what role it plays in the purchase.
| Value | Who controls it? | Use |
|---|---|---|
| Service duration | Store | Custom product field |
| Delivery method | Store | Custom product field |
| Customer project note | Buyer | Customer option |
| Service category | Store | Taxonomy or category |
| Package with a different price | Store | Purchasable version or variation |
| Shared filter value | Store | Product attribute |
This decision prevents a common catalog problem: using one feature for every kind of information. Product fields should describe the service itself. Buyer inputs should capture order-specific requirements.
Step 1: Open the product type
Go to WooCommerce > Product Types and open the Service Package type you want to configure. If the type does not exist yet, first follow How to Create a Custom Product Type in WooCommerce.
Build fields at the product-type level when multiple products share the same structure. This is what turns a few isolated metadata values into a reusable editing workflow.
Step 2: Enable the admin fields section
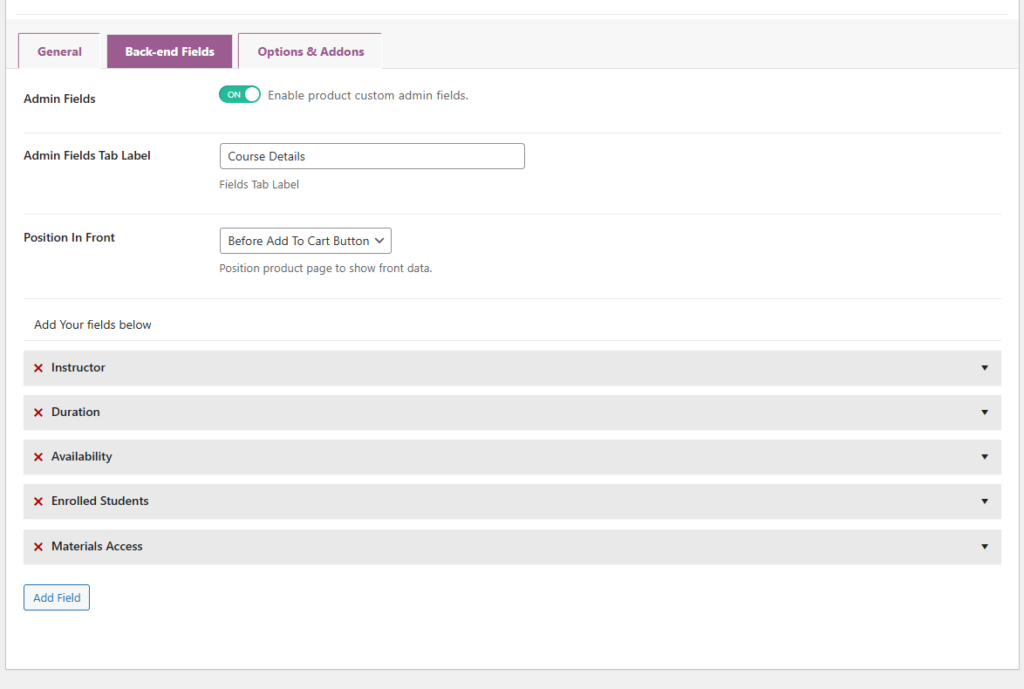
Open Back-end Fields and enable Admin Fields. Then set Admin Fields Tab Label to Service Details.
The label should match the task an editor is completing. “Service Details” is clearer than a generic label such as “Extra Data” because it tells staff exactly what belongs in the tab.
A focused admin tab creates immediate operational benefits:
- Editors know where to enter specialized information.
- Reviewers can check required service facts in one place.
- New staff learn the catalog structure faster.
- Products use the same labels and value formats.
Step 3: Choose the right field type
The plugin supports Text, Textarea, Select, Radio, Checkbox, and Number fields for the backend product model.
| Field type | Best use | Service example |
|---|---|---|
| Text | A short name, code, or value | Service provider |
| Textarea | Longer plain-text information | Preparation requirements |
| Select | One value from a controlled list | Delivery method |
| Radio | A small choice set visible at once | Communication channel |
| Checkbox | A yes-or-no property | Follow-up included |
| Number | A numeric value | Included revisions |
Choose a controlled field when consistent values matter. If one editor enters “Video Call,” another enters “video,” and a third enters “Zoom meeting,” the storefront becomes inconsistent. A Select field can keep that vocabulary stable.
Step 4: Build the Service Details field set
A useful first field set could be:
| Label | Type | Example value | Purpose |
|---|---|---|---|
| Service Duration | Text | 60 minutes | Sets the expected commitment |
| Delivery Method | Select | Video call | Explains how the service is delivered |
| Response Time | Text | Within one business day | Creates a clear expectation |
| Included Revisions | Number | 2 | Defines the included scope |
| Follow-up Included | Checkbox | Yes | Highlights an included benefit |
| Preparation Requirements | Textarea | Send the project brief before the session | Helps the customer arrive prepared |
| Communication Channel | Radio | Video call | Keeps a small set of service modes consistent |
Use concise labels customers can understand without translation from internal terminology. Add a description when the editor needs guidance about format, units, or the expected level of detail.
Step 5: Keep native WooCommerce data in its native controls
Do not duplicate a value already handled well by WooCommerce. Product title, description, regular price, sale price, SKU, stock, weight, dimensions, and shipping settings should remain in their native controls when those controls match the product.
Custom fields are most valuable for information unique to the Service Package model. Avoiding duplicate data gives editors one source of truth and reduces conflicting values on the product page.
Step 6: Decide which fields customers should see
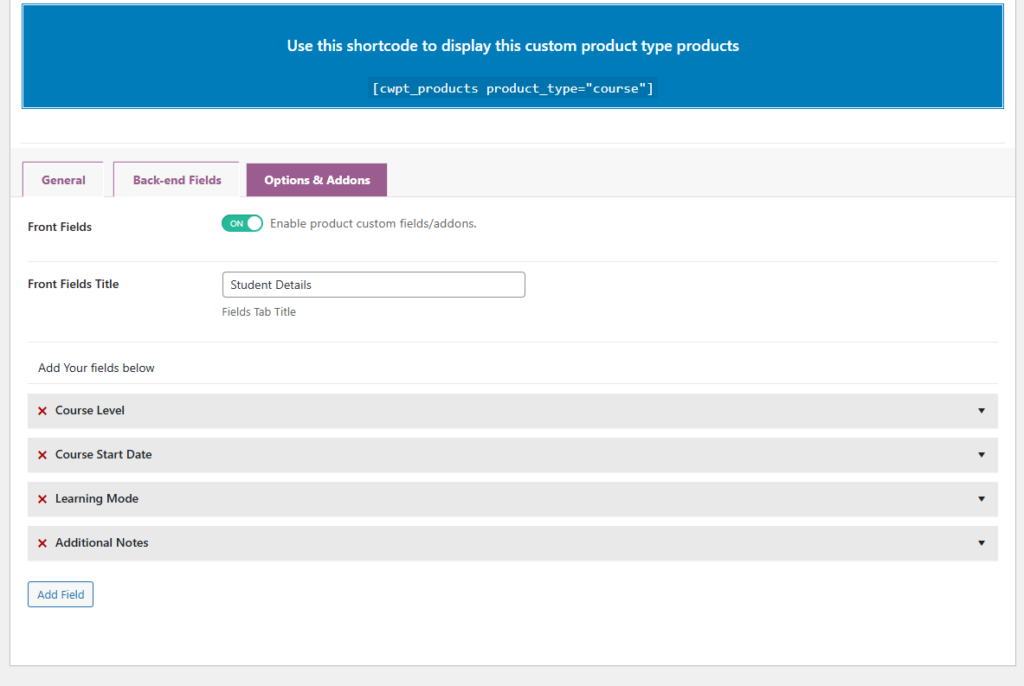
Enable Show In Front only for fields that improve the buying decision. Service Duration, Delivery Method, Response Time, Included Revisions, and Follow-up Included can all strengthen the offer.
Preparation Requirements may be helpful before purchase, but internal fulfillment notes should remain in the dashboard. The test is simple: does this value help the customer understand what they will receive?
| Field | Public? | Reason |
|---|---|---|
| Service Duration | Yes | Clarifies the size of the service |
| Response Time | Yes | Sets an expectation |
| Included Revisions | Yes | Defines the offer |
| Internal margin target | No | Business-only information |
| Staff preparation note | No | Operational information |
Step 7: Choose the frontend position
Use Position In Front to control where the selected field appears. Verified positions include:
- Before the Add to Cart button.
- After the Add to Cart button.
- Before Product Meta.
- After Product Meta.
- Inside the Single Product Summary.
Match placement to importance. Duration, delivery method, and revisions support the purchase decision, so they can appear before Add to Cart or in the Single Product Summary. Secondary service specifications can appear after Add to Cart or near Product Meta.
The dedicated frontend field display guide covers this placement workflow in detail.
Step 8: Separate product fields from buyer input
A field in Service Details defines the offer. A customer option captures a value for one purchase.
| Requirement | Correct layer |
|---|---|
| Delivery method offered by the service | Product field |
| Number of revisions included | Product field |
| Customer project description | Buyer input |
| Customer file upload | Buyer input |
| Preferred appointment date | Booking-oriented buyer input |
When the standard product model is already correct and the main requirement is collecting buyer text, selections, uploads, or booking details, review Product Add-Ons, Custom Fields & Booking for WooCommerce. The architectural decision is explained in Custom Product Type vs Product Add-Ons in WooCommerce.
Step 9: Test the fields on a realistic product
- Go to Products > Add New.
- Select the Service Package product type.
- Open the Service Details tab.
- Complete every field with realistic values.
- Save and reopen the product to confirm the values remain available.
- Preview the frontend positions on desktop and mobile.
- Create a second product with optional fields left empty and inspect the page again.
The second test matters because a field structure should remain clean when an optional value is not used. It also shows whether labels and descriptions give editors enough guidance without relying on tribal knowledge.
A field model that improves sales and operations
Well-designed fields do more than organize metadata. They help customers compare offers, reduce pre-sale questions, and give the content team a reliable publishing checklist. They also keep the product description focused on value instead of forcing it to carry every specification.
Start with the minimum field set that supports the product and the purchase. Add another field only when it has a clear owner, format, and destination.
Custom Product Type for WooCommerce provides the visual product-type, admin-tab, field, and frontend-placement workflow needed to turn that plan into a reusable WooCommerce model.
Frequently asked questions
Which custom field types can I add to a WooCommerce product type?
The backend product model supports Text, Textarea, Select, Radio, Checkbox, and Number fields.
How do I show a custom product field on the product page?
Enable Show In Front for the field, then choose its Position In Front around Add to Cart, Product Meta, or the Single Product Summary.
Should customer notes be added as product fields?
No. A product field stores information controlled by the store. A note supplied by a customer is buyer input and should use the customer-option layer.
Should I use a custom field or an attribute?
Use an attribute when the value supports shared catalog classification, filtering, or variations. Use a custom field for structured product information that belongs to the specialized model.
How many custom fields should a product type have?
Use the smallest set that supports editing and purchasing. Every field should have a clear owner, format, purpose, and display decision.

![Best WooCommerce Product Feed Plugins to Sell on Multiple Marketplaces [2026] | WPSAAD](https://wpsaad.com/wp-content/uploads/2026/08/Product-feed-plugin-guest-post-300x300.webp "Best WooCommerce Product Feed Plugins to Sell on Multiple Marketplaces [2026] | WPSAAD")