

A WooCommerce product type plugin setup is complete only when editors can create a second product without rebuilding the model or asking where each value belongs. Use this checklist after choosing a plugin to turn its settings into a repeatable catalog workflow.
The example below configures a Book product type, but the same QA sequence works for courses, services, rentals, events, furniture, and other specialized product families.
Define the acceptance test before configuring the plugin
Choose one representative product and write down the result the store needs. For a Book model, the editor should be able to select Book as the product type, complete publishing details in one tab, expose useful specifications on the product page, and add the book to an intentional catalog path.
| Layer | Book example | Acceptance test |
|---|---|---|
| Type identity | Book and Books labels | The type is recognizable in the editor |
| Admin workflow | Book Details tab | Publishing data has one clear location |
| Structured data | Author, ISBN, page count, binding | Values use consistent controls |
| Frontend output | Author and edition | Customers see decision-relevant facts |
| Discovery | Book taxonomy or collection page | The family has a reachable catalog path |
Step 1: Create the product type identity
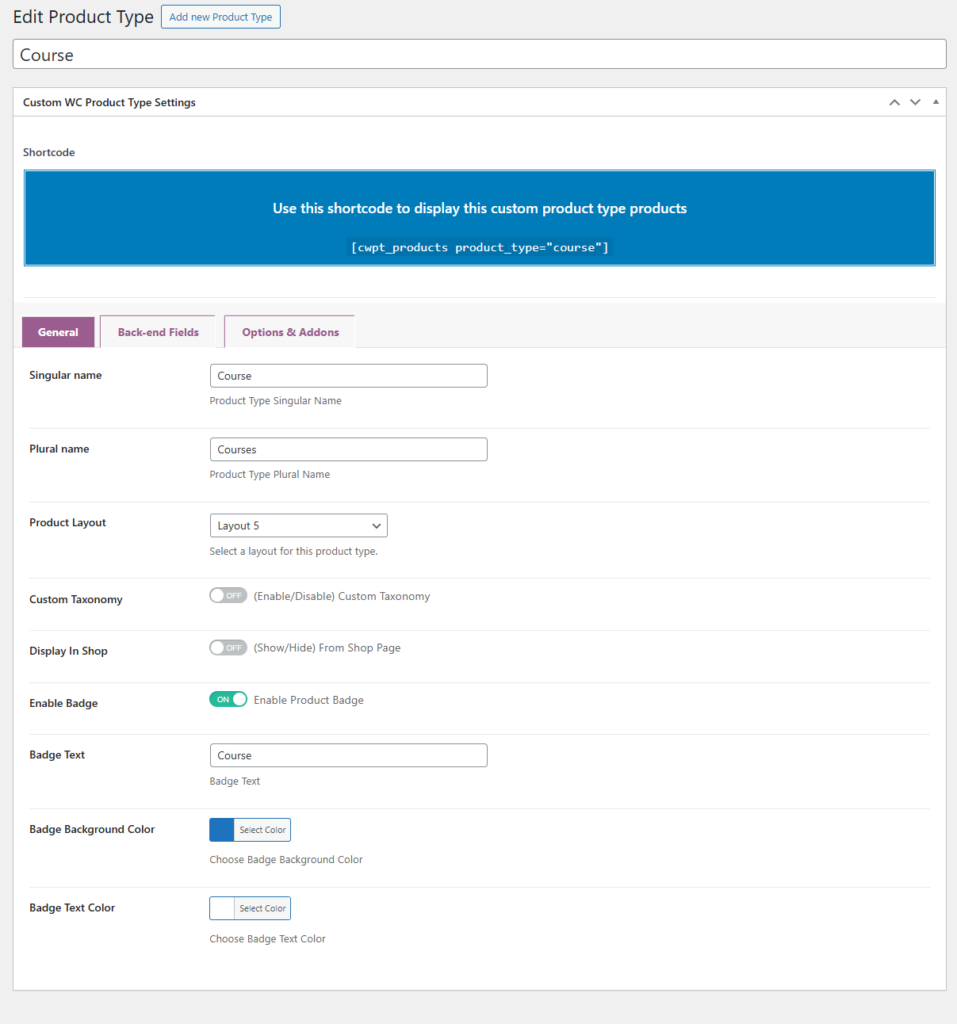
- Go to WooCommerce > Product Types > Add New.
- Enter Book as the singular label.
- Enter Books as the plural label.
- Keep the default WooCommerce layout or preview another layout available in the installed version.
- Save the product type before building its field model.
Custom Product Type for WooCommerce provides the visual type, field, storefront, and catalog controls used in this checklist.
Step 2: Decide the catalog path
Configure catalog controls according to how customers should discover the Book family. Use Display In Shop when books belong in the main store catalog. Use Custom Taxonomy when the type needs a dedicated hierarchy, such as Fiction, Business, or Technical Books.
A badge is useful only when it communicates a meaningful distinction in product listings. Avoid adding a badge merely because the setting exists.
Step 3: Build one focused admin tab
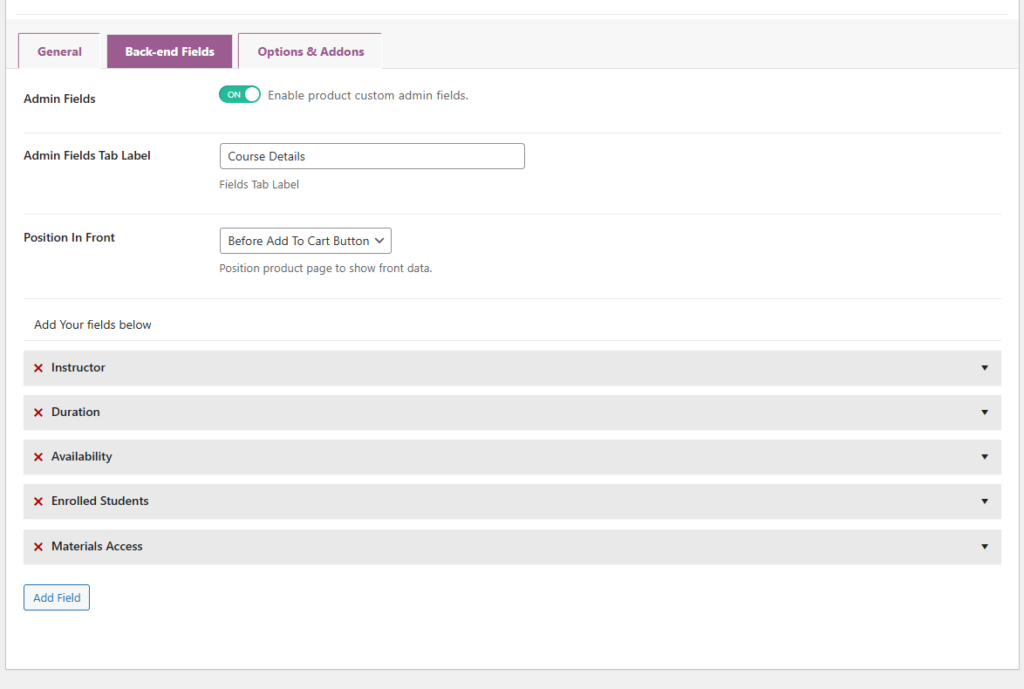
Open Back-end Fields, enable Admin Fields, and set Admin Fields Tab Label to Book Details. The tab should contain values that describe the book rather than customer input or native WooCommerce commerce data.
| Field | Control | Example |
|---|---|---|
| Author | Text | Jane Smith |
| ISBN | Text | 978-1-23456-789-0 |
| Page Count | Number | 320 |
| Binding | Select | Hardcover |
| Edition Notes | Textarea | Revised second edition |
| Illustrated | Checkbox | Yes |
Use the custom field guide to choose field controls and separate product facts from buyer-supplied values.
Step 4: Keep native commerce data in WooCommerce
Do not duplicate title, description, price, SKU, stock, weight, dimensions, tax, or shipping settings in the custom tab when native WooCommerce controls already own those values. One authoritative location prevents conflicting product information.
Step 5: Map fields to the storefront
Enable Show In Front only for fields that help customers evaluate the book. Author, binding, page count, and edition may be public; internal acquisition notes should remain private.
Choose Position In Front according to importance: before or after Add to Cart, before or after Product Meta, or inside the Single Product Summary. Verify the exact output with the frontend field display guide.
Step 6: Create two test products
- Create one complete Book product with every planned field populated.
- Save and reopen it to confirm the values remain available.
- Preview the product page on desktop and mobile.
- Create a second Book with optional values left empty.
- Confirm the page remains clear and no empty labels weaken the presentation.
The second product is the real repeatability test. A setup that works only for one fully populated example is not ready for an editorial team.
Step 7: Test the collection path
When the Book family needs a dedicated page, use the verified shortcode with the actual product-type slug:
[cwpt_products product_type="book"]The implementation displays 12 products through the WooCommerce loop. Do not invent columns, ordering, pagination, limit, or per-page parameters. Follow the shortcode guide for the complete output and troubleshooting checklist.
Step 8: Run the editor handoff test
Ask another editor to create a third Book product without verbal instructions. Record where they hesitate, which labels are unclear, and which values they enter inconsistently. Improve the model rather than adding an external checklist for every avoidable decision.
Final setup QA
- The product type has clear singular and plural labels.
- The admin tab contains only specialized store-managed data.
- Every field has a defined owner, format, and destination.
- Native WooCommerce values are not duplicated.
- Public fields appear in useful product-page positions.
- Private fields remain in the dashboard.
- Optional empty fields do not create confusing output.
- The collection page uses the verified shortcode syntax.
- A second editor can reuse the workflow consistently.
For the initial creation sequence, use How to Create a Custom Product Type in WooCommerce. Return to this checklist after configuration changes to verify that the editor, storefront, and catalog still work as one system.
Frequently asked questions
Should every extra product field create a new product type?
No. Create a type when several products share a meaningful specialized model and workflow.
How many products should I test?
Test at least one complete product, one product with optional values empty, and one product created by a second editor.
What is the most important setup result?
The next editor should be able to create a consistent product without rebuilding the structure or duplicating data.

![Best WooCommerce Product Feed Plugins to Sell on Multiple Marketplaces [2026] | WPSAAD](https://wpsaad.com/wp-content/uploads/2026/08/Product-feed-plugin-guest-post-300x300.webp "Best WooCommerce Product Feed Plugins to Sell on Multiple Marketplaces [2026] | WPSAAD")